Body message: Difference between revisions
mNo edit summary |
Stohrendorf1 (talk | contribs) (add another guess for G4) |
||
| (46 intermediate revisions by the same user not shown) | |||
| Line 1: | Line 1: | ||
The body message is a long-running key element of the INFRA [[ARG]], the first ever element of it that was discovered. | The body message is a long-running key element of the INFRA [[ARG]], the first ever element of it that was discovered. | ||
[[File:Body_message.jpg|alt=|right|frameless|500px]] | |||
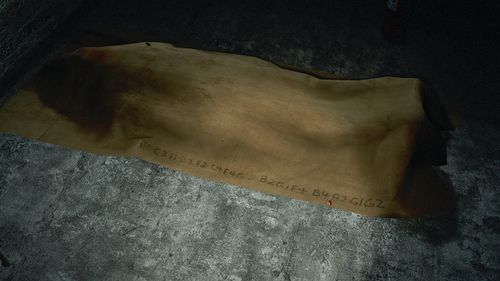
It's located in [[reserve3]] and is a code written on the sheet which covers a corpse in a side building. | |||
The body itself is likely [[Albert Hartman]]. | {{Needs-investigation}} The body itself is likely [[Albert Hartman]]. | ||
[[ | The code within it corresponds to keys for solving the [[Bunker computer code]] and [[Wasteland notes]]. | ||
== | ==The Message== | ||
The code sequence | |||
The code sequence written on the body is: | |||
B1 C3 F1 B2 F2 C4 E4 G3 B2 G1 F4 B4 B2 G1 G2 | B1 C3 F1 B2 F2 C4 E4 G3 B2 G1 F4 B4 B2 G1 G2 | ||
Which translates to: | Which (currently) translates to: | ||
I will (F1(show?)) the truth (C4( | I will (F1(show/share/...?)) the truth (C4(if?)) (E4(you?)) tell the right answer to the right person. | ||
It is | It is currently unknown what the "answer" is, but a hint suggests it is three words (see F4). | ||
The entire body message revolves around a series of | {{Encryption-key}} The entire body message revolves around a series of alphanumeric references, which correspond to words that have been found in INFRA maps and textures. The following is a table containing all of the current keys and their corresponding words. | ||
{| class="wikitable" | {| class="wikitable" | ||
|- | |- | ||
! scope="col"|Key | ! scope="col" |Key | ||
! scope="col"|Word | ! scope="col" |Word | ||
! scope="col"|Source | ! scope="col" |Source | ||
! scope="col"| | !Location | ||
! scope="col" |Verification | |||
|- | |- | ||
| colspan=" | | colspan="5" style="text-align:center;" |'''A''' | ||
|- | |- | ||
|'''A1''' | |'''A1''' | ||
| | |WHAT | ||
| | |control_panel_003-6.vtf | ||
|reserve2 | |||
|Confirmed | |Confirmed | ||
|- | |- | ||
|'''A2''' | |'''A2''' | ||
| | |HAPPENED | ||
| | |control_panel_003-6.vtf | ||
|reserve2 | |||
|Confirmed | |Confirmed | ||
|- | |- | ||
|'''A3''' | |'''A3''' | ||
| | |TO | ||
| | |control_panel_003-6.vtf | ||
|Confirmed | |reserve2 | ||
|Confirmed (See note 3.) | |||
|- | |- | ||
|'''A4''' | |'''A4''' | ||
|AH | |AH | ||
| | |control_panel_003-6.vtf | ||
|reserve2 | |||
|Confirmed | |Confirmed | ||
|- | |- | ||
| colspan=" | | colspan="5" style="text-align:center;" |'''B''' | ||
|- | |- | ||
|'''B1''' | |'''B1*''' | ||
|I | |I | ||
| | |railroad_signal_control_box.vtf | ||
|reserve1 | |||
|Confirmed | |Confirmed | ||
|- | |- | ||
|'''B2''' | |'''B2*''' | ||
| | |THE | ||
| | |electricalbox_012.vtf, metro_control_panel_001.vtf | ||
|tunnel2 | |||
|Confirmed | |Confirmed | ||
|- | |- | ||
|B3 | |'''B3''' | ||
| | |IN | ||
| | |puzzle_box_009.vtf, electricalbox_001.vtf, metro_control_panel_001.vtf | ||
|tunnel4 | |||
|Confirmed | |Confirmed | ||
|- | |- | ||
|B4 | |'''B4*''' | ||
| | |TO | ||
| | |electricalbox_012.vtf | ||
|tunnel2 | |||
|Confirmed | |Confirmed | ||
|- | |- | ||
| colspan=" | | colspan="5" style="text-align:center;" |'''C''' | ||
|- | |- | ||
|C1 | |'''C1''' | ||
| | |IS | ||
| | |fuses_02.vtf | ||
|reserve1 | |||
|Confirmed | |Confirmed | ||
|- | |- | ||
|C2 | |'''C2''' | ||
| | |{{Needs-investigation}} ''OCEAN'' | ||
| | |sign_14_skin7.vtf | ||
| | |bunker | ||
|Unconfirmed (see below) | |||
|- | |- | ||
|'''C3''' | |'''C3*''' | ||
| | |WILL | ||
| | |metro_control_panel_001.vtf | ||
|central | |||
|Confirmed | |Confirmed | ||
|- | |- | ||
|'''C4''' | |'''C4*''' | ||
| | ||{{Needs-investigation}} ''IF'' | ||
| | | - | ||
| | | - | ||
|Speculation | |||
|- | |- | ||
| colspan=" | | colspan="5" style="text-align:center;" |'''D''' | ||
|- | |- | ||
|D1 | |'''D1''' | ||
| | |{{Needs-investigation}} ''OTHER WORLD'' | ||
|Bunker Drawing | |Bunker Drawing | ||
| | | - | ||
|Unconfirmed | |||
|- | |- | ||
|D2 | |'''D2''' | ||
| | |<nowiki>-</nowiki> | ||
| | | - | ||
| | | - | ||
|<nowiki>-</nowiki> | |||
|- | |- | ||
|D3 | |'''D3''' | ||
| | |<nowiki>-</nowiki> | ||
| | |<nowiki>-</nowiki> | ||
| | | - | ||
|<nowiki>-</nowiki> | |||
|- | |- | ||
|D4 | |'''D4''' | ||
| | | - | ||
| | | - | ||
| | | - | ||
| - | |||
|- | |- | ||
| colspan=" | | colspan="5" style="text-align:center;" |'''E''' | ||
|- | |- | ||
|E1 | |'''E1''' | ||
|IS | |IS | ||
| | |electricalbox_001.vtf | ||
|reserve1 | |||
|Confirmed | |Confirmed | ||
|- | |- | ||
|E2 | |'''E2''' | ||
| | | - | ||
| | |<nowiki>-</nowiki> | ||
| | | - | ||
| - | |||
|- | |- | ||
|E3 | |'''E3''' | ||
| | |<nowiki>-</nowiki> | ||
| | |<nowiki>-</nowiki> | ||
| | | - | ||
|<nowiki>-</nowiki> | |||
|- | |- | ||
|'''E4''' | |'''E4*''' | ||
| | |{{Needs-investigation}} ?O / ''YOU'' | ||
| | | - | ||
| | | - | ||
|Partial through [[Bunker computer code]]; speculation | |||
|- | |- | ||
| colspan=" | | colspan="5" style="text-align:center;" |'''F''' | ||
|- | |- | ||
|'''F1''' | |'''F1*''' | ||
| | |{{Needs-investigation}} SH?? / ''SHOW'' | ||
| | | | ||
| | | - | ||
|Partial through [[Bunker computer code]]; speculation (See note 4.) | |||
|- | |- | ||
|'''F2''' | |'''F2*''' | ||
| | |TRUTH | ||
| | |hallway_f2.vtf | ||
| | |Unused | ||
|Confirmed | |||
|- | |- | ||
|F3 | |'''F3''' | ||
| | |<nowiki>-</nowiki> | ||
| | |<nowiki>-</nowiki> | ||
| | | - | ||
|<nowiki>-</nowiki> | |||
|- | |- | ||
|'''F4''' | |'''F4*''' | ||
| | |ANSWER | ||
| | |bunker_room_005.vtf | ||
|Confirmed | |bunker | ||
|Confirmed? (See note 1.) | |||
|- | |- | ||
| colspan=" | | colspan="5" style="text-align:center;" |'''G''' | ||
|- | |- | ||
|'''G1''' | |'''G1*''' | ||
| | |RIGHT | ||
| | |scientific_table_001_skin3.vtf | ||
|Confirmed | |watertreatment | ||
|Confirmed from [[Letter box]] | |||
|- | |- | ||
|'''G2''' | |'''G2*''' | ||
| | |PERSON | ||
| | |scientific_table_001_skin3.vtf | ||
|Confirmed | |watertreatment | ||
|Confirmed from [[Letter box]] | |||
|- | |- | ||
|'''G3''' | |'''G3*''' | ||
| | |TELL | ||
| | |scientific_table_001_skin3.vtf | ||
|Confirmed | |watertreatment | ||
|Confirmed from [[Letter box]] | |||
|- | |- | ||
|G4 | |'''G4''' | ||
| | |{{Needs-investigation}} ''SON; INSIDE'' | ||
| | |scientific_table_001_skin3.vtf; bunker_room_001.vtf | ||
| | |watertreatment | ||
|Unconfirmed | |||
|- | |- | ||
| colspan=" | | colspan="5" style="text-align:center;" |'''H''' | ||
|- | |- | ||
|H1 | |'''H1''' | ||
| | |<nowiki>-</nowiki> | ||
| | |<nowiki>-</nowiki> | ||
| | | - | ||
|<nowiki>-</nowiki> | |||
|- | |- | ||
|H2 | |'''H2''' | ||
| | |<nowiki>-</nowiki> | ||
| | |<nowiki>-</nowiki> | ||
| | | - | ||
|<nowiki>-</nowiki> | |||
|- | |- | ||
|H3 | |'''H3''' | ||
| | |<nowiki>-</nowiki> | ||
| | |<nowiki>-</nowiki> | ||
| | | - | ||
|<nowiki>-</nowiki> | |||
|- | |- | ||
|'''H4''' | |'''H4''' | ||
|????E | |????E | ||
| | | - | ||
| | | - | ||
|Partial through [[Bunker computer code]]. (See note 2.) | |||
|- | |- | ||
|} | |} | ||
== | ===Notes=== | ||
[[ | #F4 is a unique instance in which there's conflicting information on what the word should be. In reserve2, near the bird lookout spot, there is writing on the info-board about Hammer Valley birds which claims "F4 3 words", yet the [[Bunker computer code|bunker computer code]] requires it to be "answer". But as the note on the info-board is localized for different game languages, it seems likely that the information is ''about'' the answer. {{Needs-investigation}} The [[Reactor lights code]] might be the answer, as its decoded message reads "world is lie", which matches the meta information. | ||
#Although the bunker computer code requires <code>H4.5=E</code>, it is worth mentioning that <code>0x45</code> is the ASCII code for <code>E</code>. | |||
#The bunker computer code requires <code>A3.2=C</code>. | |||
#The second reference table of the bunker computer code contains the line <code>Body Message Question Show Truth</code>, which supports F1=SHOW. {{Needs-investigation}} This poses the question what the correct question is. | |||
== | ==Hint from Zuntti== | ||
The hint Zuntti gave us for this "code segment" is "BUN_BREAKER_CEN_CONTROL_VI_OFFICE_RE_SNW". | The hint Zuntti gave us for this "code segment" is {{Zuntti-hint}} "BUN_BREAKER_CEN_CONTROL_VI_OFFICE_RE_SNW". There are four clues here, each representing a location or map in INFRA. | ||
There are four clues here, each representing a location or map in INFRA. | |||
"[[Bunker]] breaker, central control (room) (the control room in [[Central]]), [[Villa]] office, [[Reactor]] SNW (area)?" | "[[Bunker]] breaker, central control (room) (the control room in [[Central]]), [[Villa]] office, [[Reactor]] SNW (area)?" | ||
=== [[Bunker]] breaker === | ===[[Bunker]] breaker=== | ||
This clue refers to the breakers outside the [[Bunker]], in the [[Servicetunnel]] map. This has been confirmed by [[User:Zuntti|Zuntti]]'s screenshot.<br /> | This clue refers to the breakers outside the [[Bunker]], in the [[Servicetunnel]] map. This has been confirmed by [[User:Zuntti|Zuntti]]'s screenshot.<br /> | ||
Possibilities here are the signs on the breakers themselves which have small text as follows: | Possibilities here are the signs on the breakers themselves which have small text as follows: | ||
(Breaker 1) Main text: TGD-SBC-4, small text: BR4 TGDNUM PO7 TGD1<br /> | (Breaker 1, <code>sign_14_skin5</code>) Main text: TGD-SBC-4, small text: BR4 TGDNUM PO7 TGD1<br /> | ||
(Breaker 2) Main text: HW-SBC-2, small text: BR4 HWNUM+1 O34 C87 EA2 N6 | (Breaker 2, <code>sign_14_skin7</code>) Main text: HW-SBC-2, small text: BR4 HWNUM+1 O34 C87 EA2 N6 | ||
TGD could mean Two Gorges Dam, and HW is probably Hammer Valley Water Dam. Both breaker small texts have a "NUM" on them, prefixed by their name, with 1 being added to HWNUM.<br /> | TGD could mean Two Gorges Dam, and HW is probably Hammer Valley Water Dam. Both breaker small texts have a "NUM" on them, prefixed by their name, with 1 being added to HWNUM.<br /> | ||
Another possibility was the book with the bunker codes, however some codes are completely illegible and decoding with several bases does not result in anything of note.<br/> | Another possibility was the book with the bunker codes (<code>binder_002_skin6</code>), however some codes are completely illegible and decoding with several bases does not result in anything of note.<br /> | ||
Reading only the letters on breaker 2 reveals word "OCEAN". The breaker is assigned with number 2 so HWNUM+1 could be 3. | Reading only the letters on breaker 2 reveals word "OCEAN". The breaker is assigned with number 2 so HWNUM+1 could be 3. | ||
===[[Central]] control=== | |||
This clue refers to the control room in [[Central]], where there are a few code possibilities. It contains the codes B1, B2, B3, B4 and C3. | |||
=== [[Central]] control === | |||
This clue refers to the control room in [[Central]], where there are a few code possibilities. | |||
==== Morse ==== | ====Morse==== | ||
The first one is the [[Central projector morse]], which does not produce a code but a message/clue about "the right person". | The first one is the [[Central projector morse]], which does not produce a code but a message/clue about "the right person". | ||
==== Pegboard ==== | ====Pegboard==== | ||
The second one is the pegboard, which has two possibilities of its own: the pegs, the markers behind, and the unrelated notes stuck to the pegboard.<br /> | The second one is the pegboard, which has two possibilities of its own: the pegs, the markers behind, and the unrelated notes stuck to the pegboard.<br /> | ||
(Click this image for a HD, zoomable view.) | (Click this image for a HD, zoomable view.) | ||
| Line 239: | Line 273: | ||
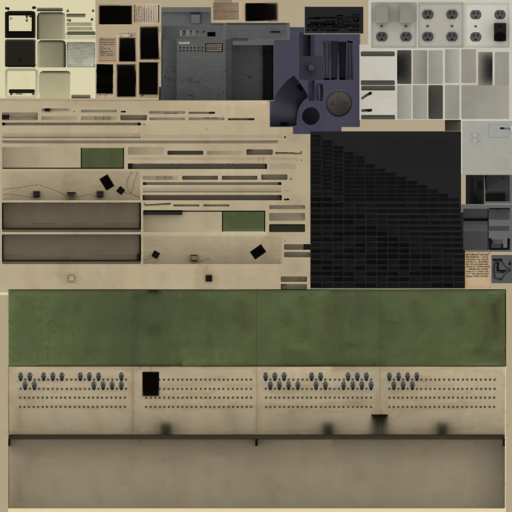
[[File:metro_control_panel_001.png|512px]] | [[File:metro_control_panel_001.png|512px]] | ||
===== Pegs ===== | =====Pegs===== | ||
These are the pegboard pegs, transcribed.< | These are the pegboard pegs, transcribed. | ||
<code>E</code> means empty, <code>P</code> means peg and <code>M</code> means peg with marker. | |||
MPMEEMPMPMEEEMPMPMPEEEMP | MPMEEMPMPMEEEMPMPMPEEEMP | ||
PMPMPPEPEEEEEEEEMPMPMPMP | PMPMPPEPEEEEEEEEMPMPMPMP | ||
( | (E for 2 lines) | ||
(break) | (break) | ||
( | (E for 4 lines) | ||
(break) | (break) | ||
MPMPMPEEEEMPMPEEEEMPMPMP | MPMPMPEEEEMPMPEEEEMPMPMP | ||
PMPMPMPMEEEMEMPEPMPMPMPM | PMPMPMPMEEEMEMPEPMPMPMPM | ||
( | (E for 2 lines) | ||
(break) | (break) | ||
MPMPMPMPEEEEEEEEEEEEEEEE | MPMPMPMPEEEEEEEEEEEEEEEE | ||
PMPMPMEEEEEEEEEEEEEEEEEE | PMPMPMEEEEEEEEEEEEEEEEEE | ||
( | (E for 2 lines) | ||
(end) | (end) | ||
===== Notes ===== | =====Peg Counts===== | ||
====== Note 1 ====== | 4 blocks, with 4 rows each. Not counting the last two rows: | ||
*<code>M+P+E</code> - 24 slots per row and block, 96 slots in total per row | |||
*<code>M+P</code> - 40 per row | |||
**when removing <code>E</code> from the rows, and comparing <code>M</code> and <code>P</code> pairwise between the rows, 15 of the 40 places have the same <code>M</code> or <code>P</code> between the rows, 25 are different | |||
**when removing <code>E</code> from the rows, and splitting between slots that diverge from the alternating <code>MP</code> pattern, you get 10 groups | |||
*<code>M</code> - 21 in the first row, 19 in the second row, 40 total | |||
*<code>P</code> - 19 in the first row, 21 in the second row, 40 total | |||
*<code>E</code> - 56 per row | |||
=====Notes===== | |||
======Note 1====== | |||
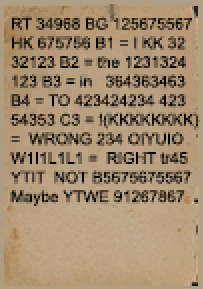
[[File:Pegboard_note_1.png]] | [[File:Pegboard_note_1.png]] | ||
| Line 280: | Line 326: | ||
C3 = WILL | C3 = WILL | ||
====== Note 2 ====== | ======Note 2====== | ||
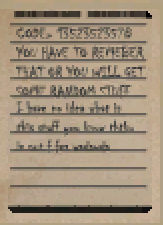
[[File:Pegboard_note_2.png]] | [[File:Pegboard_note_2.png]] | ||
| Line 288: | Line 334: | ||
SOME RANDOM STUFF | SOME RANDOM STUFF | ||
I have no idea what is | I have no idea what is | ||
the stuff you know | the stuff you know thats | ||
(unreadable) | im out of for (unreadable) | ||
======Note 3====== | |||
[[File:Pegboard_note_3.png]] | |||
This note was created using the font [https://docs.microsoft.com/en-us/typography/font-list/blackadder-itc Blackadder ITC]. | |||
<pre> | |||
Metro f mir dlhl by ** | |||
f****f ***** (SMW***/SMT***/suljettu) | |||
I'm different in f**f*** *** | |||
täs mitää | |||
Ei tää mitää meinaa | |||
E3 * | |||
CODE 4 4 * 4 * (or CODE 34 64 5 64 66) | |||
FATAL MO(U?)TH | |||
</pre> | |||
=== [[Villa]] office === | ===[[Villa]] office=== | ||
See [[Villa woodboxes]]. | See [[Villa woodboxes]]. | ||
=== [[Reactor]] SNW === | ===[[Reactor]] SNW=== | ||
This clue refers to the secret SNW area of the [[Reactor]] map. The [[Reactor lights code]] is present here but | This clue refers to the secret SNW area of the [[Reactor]] map. The [[Reactor lights code]] is present here but only seems to be connected to the [[Wasteland notes]]. | ||
The control panels in the SNW control room contain the codes A1, A2, A3 and A4. | |||
==References== | |||
*Finale has done a lot of work on uncovering this information on the ARG, see his [http://steamcommunity.com/sharedfiles/filedetails/?id=612370431| Steam guide] for the initial information. <br /> | |||
[[Category:ARG]] | [[Category:ARG]] | ||
Latest revision as of 08:37, 21 September 2023
The body message is a long-running key element of the INFRA ARG, the first ever element of it that was discovered.
It's located in reserve3 and is a code written on the sheet which covers a corpse in a side building.
![]() The body itself is likely Albert Hartman.
The body itself is likely Albert Hartman.
The code within it corresponds to keys for solving the Bunker computer code and Wasteland notes.
The Message[edit | edit source]
The code sequence written on the body is:
B1 C3 F1 B2 F2 C4 E4 G3 B2 G1 F4 B4 B2 G1 G2
Which (currently) translates to:
I will (F1(show/share/...?)) the truth (C4(if?)) (E4(you?)) tell the right answer to the right person.
It is currently unknown what the "answer" is, but a hint suggests it is three words (see F4).
🔑 The entire body message revolves around a series of alphanumeric references, which correspond to words that have been found in INFRA maps and textures. The following is a table containing all of the current keys and their corresponding words.
| Key | Word | Source | Location | Verification |
|---|---|---|---|---|
| A | ||||
| A1 | WHAT | control_panel_003-6.vtf | reserve2 | Confirmed |
| A2 | HAPPENED | control_panel_003-6.vtf | reserve2 | Confirmed |
| A3 | TO | control_panel_003-6.vtf | reserve2 | Confirmed (See note 3.) |
| A4 | AH | control_panel_003-6.vtf | reserve2 | Confirmed |
| B | ||||
| B1* | I | railroad_signal_control_box.vtf | reserve1 | Confirmed |
| B2* | THE | electricalbox_012.vtf, metro_control_panel_001.vtf | tunnel2 | Confirmed |
| B3 | IN | puzzle_box_009.vtf, electricalbox_001.vtf, metro_control_panel_001.vtf | tunnel4 | Confirmed |
| B4* | TO | electricalbox_012.vtf | tunnel2 | Confirmed |
| C | ||||
| C1 | IS | fuses_02.vtf | reserve1 | Confirmed |
| C2 | sign_14_skin7.vtf | bunker | Unconfirmed (see below) | |
| C3* | WILL | metro_control_panel_001.vtf | central | Confirmed |
| C4* | - | - | Speculation | |
| D | ||||
| D1 | Bunker Drawing | - | Unconfirmed | |
| D2 | - | - | - | - |
| D3 | - | - | - | - |
| D4 | - | - | - | - |
| E | ||||
| E1 | IS | electricalbox_001.vtf | reserve1 | Confirmed |
| E2 | - | - | - | - |
| E3 | - | - | - | - |
| E4* | - | - | Partial through Bunker computer code; speculation | |
| F | ||||
| F1* | - | Partial through Bunker computer code; speculation (See note 4.) | ||
| F2* | TRUTH | hallway_f2.vtf | Unused | Confirmed |
| F3 | - | - | - | - |
| F4* | ANSWER | bunker_room_005.vtf | bunker | Confirmed? (See note 1.) |
| G | ||||
| G1* | RIGHT | scientific_table_001_skin3.vtf | watertreatment | Confirmed from Letter box |
| G2* | PERSON | scientific_table_001_skin3.vtf | watertreatment | Confirmed from Letter box |
| G3* | TELL | scientific_table_001_skin3.vtf | watertreatment | Confirmed from Letter box |
| G4 | scientific_table_001_skin3.vtf; bunker_room_001.vtf | watertreatment | Unconfirmed | |
| H | ||||
| H1 | - | - | - | - |
| H2 | - | - | - | - |
| H3 | - | - | - | - |
| H4 | ????E | - | - | Partial through Bunker computer code. (See note 2.) |
Notes[edit | edit source]
- F4 is a unique instance in which there's conflicting information on what the word should be. In reserve2, near the bird lookout spot, there is writing on the info-board about Hammer Valley birds which claims "F4 3 words", yet the bunker computer code requires it to be "answer". But as the note on the info-board is localized for different game languages, it seems likely that the information is about the answer.
 The Reactor lights code might be the answer, as its decoded message reads "world is lie", which matches the meta information.
 - Although the bunker computer code requires
H4.5=E, it is worth mentioning that0x45is the ASCII code forE. - The bunker computer code requires
A3.2=C. - The second reference table of the bunker computer code contains the line
Body Message Question Show Truth, which supports F1=SHOW. This poses the question what the correct question is.
Hint from Zuntti[edit | edit source]
The hint Zuntti gave us for this "code segment" is ![]() "BUN_BREAKER_CEN_CONTROL_VI_OFFICE_RE_SNW". There are four clues here, each representing a location or map in INFRA.
"BUN_BREAKER_CEN_CONTROL_VI_OFFICE_RE_SNW". There are four clues here, each representing a location or map in INFRA.
"Bunker breaker, central control (room) (the control room in Central), Villa office, Reactor SNW (area)?"
Bunker breaker[edit | edit source]
This clue refers to the breakers outside the Bunker, in the Servicetunnel map. This has been confirmed by Zuntti's screenshot.
Possibilities here are the signs on the breakers themselves which have small text as follows:
(Breaker 1, sign_14_skin5) Main text: TGD-SBC-4, small text: BR4 TGDNUM PO7 TGD1
(Breaker 2, sign_14_skin7) Main text: HW-SBC-2, small text: BR4 HWNUM+1 O34 C87 EA2 N6
TGD could mean Two Gorges Dam, and HW is probably Hammer Valley Water Dam. Both breaker small texts have a "NUM" on them, prefixed by their name, with 1 being added to HWNUM.
Another possibility was the book with the bunker codes (binder_002_skin6), however some codes are completely illegible and decoding with several bases does not result in anything of note.
Reading only the letters on breaker 2 reveals word "OCEAN". The breaker is assigned with number 2 so HWNUM+1 could be 3.
Central control[edit | edit source]
This clue refers to the control room in Central, where there are a few code possibilities. It contains the codes B1, B2, B3, B4 and C3.
Morse[edit | edit source]
The first one is the Central projector morse, which does not produce a code but a message/clue about "the right person".
Pegboard[edit | edit source]
The second one is the pegboard, which has two possibilities of its own: the pegs, the markers behind, and the unrelated notes stuck to the pegboard.
(Click this image for a HD, zoomable view.)
Pegs[edit | edit source]
These are the pegboard pegs, transcribed.
E means empty, P means peg and M means peg with marker.
MPMEEMPMPMEEEMPMPMPEEEMP
PMPMPPEPEEEEEEEEMPMPMPMP
(E for 2 lines)
(break)
(E for 4 lines)
(break)
MPMPMPEEEEMPMPEEEEMPMPMP
PMPMPMPMEEEMEMPEPMPMPMPM
(E for 2 lines)
(break)
MPMPMPMPEEEEEEEEEEEEEEEE
PMPMPMEEEEEEEEEEEEEEEEEE
(E for 2 lines)
(end)
Peg Counts[edit | edit source]
4 blocks, with 4 rows each. Not counting the last two rows:
M+P+E- 24 slots per row and block, 96 slots in total per rowM+P- 40 per row- when removing
Efrom the rows, and comparingMandPpairwise between the rows, 15 of the 40 places have the sameMorPbetween the rows, 25 are different - when removing
Efrom the rows, and splitting between slots that diverge from the alternatingMPpattern, you get 10 groups
- when removing
M- 21 in the first row, 19 in the second row, 40 totalP- 19 in the first row, 21 in the second row, 40 totalE- 56 per row
Notes[edit | edit source]
Note 1[edit | edit source]
RT 34968 BG 125675567
HK 675756 B1 = I KK 32
32123 B2 = the 1231324
123 B3 = in 364363463
B4 = TO 423424234 423
54353 C3 = 1(KKKKKKKK)
= WRONG 234 OIYUIO
W1I1L1L1 = RIGHT tr45
YTIT NOT B5675675567
Maybe YTWE 91267867
Removing the clutter, we can solve B1, B2, B3, B4, and C3:
B1 = I
B2 = the
B3 = in
B4 = TO
C3 = WILL
Note 2[edit | edit source]
CODE: 13523523578
YOU HAVE TO REMEMBER
THAT OR YOU WILL GET
SOME RANDOM STUFF
I have no idea what is
the stuff you know thats
im out of for (unreadable)
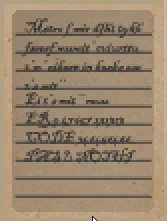
Note 3[edit | edit source]
This note was created using the font Blackadder ITC.
Metro f mir dlhl by **
f****f ***** (SMW***/SMT***/suljettu)
I'm different in f**f*** ***
täs mitää
Ei tää mitää meinaa
E3 *
CODE 4 4 * 4 * (or CODE 34 64 5 64 66)
FATAL MO(U?)TH
Villa office[edit | edit source]
See Villa woodboxes.
Reactor SNW[edit | edit source]
This clue refers to the secret SNW area of the Reactor map. The Reactor lights code is present here but only seems to be connected to the Wasteland notes.
The control panels in the SNW control room contain the codes A1, A2, A3 and A4.
References[edit | edit source]
- Finale has done a lot of work on uncovering this information on the ARG, see his Steam guide for the initial information.
